Wednesday, April 29, 2015

12: Device Review
Apr 25, revised: May 2, Aug 1, Nov 25, 2015

Devices I've wired/programmed* for the Raspberry Pi, Arduino and Spark Core (now Particle Photon)
  • LEDs (everyone starts with these) - RAS
  • Push buttons - RA
  • PIR motion detector - R
  • Magnetic door sensor - RAS
  • Photosensor RAS
  • DS18B20 temperature sensor - RAS
  • DHT22 temperature/humidity sensor - RAS
  • TMP36 temperature sensor - AS
  • Raspberry Pi camera (B/W conversion, timelapse, security cam) - R
  • Relay Switches - RS
  • Water sensor - R
  • Soil moisture sensor - AS
  • Water valve/solenoid control - RS
  • Rangefinder: ultrasonic, IR (several models) - RA
  • Speakers - RA
  • CO gas sensor - A
  • Natural gas/propane sensor - A
  • Mini vibrating motors - A
  • Pi - Arduino Com over USB - A to R
  • RF (radio frequency) read & write - A to R
  • RFID sensor - AS
  • 16x2 LCD text device - RA
  • 7-segment clock device - R
To make the above work--
  • resistors, capacitors, diodes, transistors, 
  • Darlington array - R 
  • I2C (MPC2308) - RS 
  • MPC3008 (analog) - R
  • PWM - A
  • Backup battery setup - RAS
  • Also: Internet upload/download, email, text message - RS
* Programmed in Python, C, C++, Linux Shell, Crontab

Tuesday, April 7, 2015

11: Uninterruptible Power (the other UPS) for Arduino, Spark Core or Raspberry Pi
* revised Apr 17, 2015 *

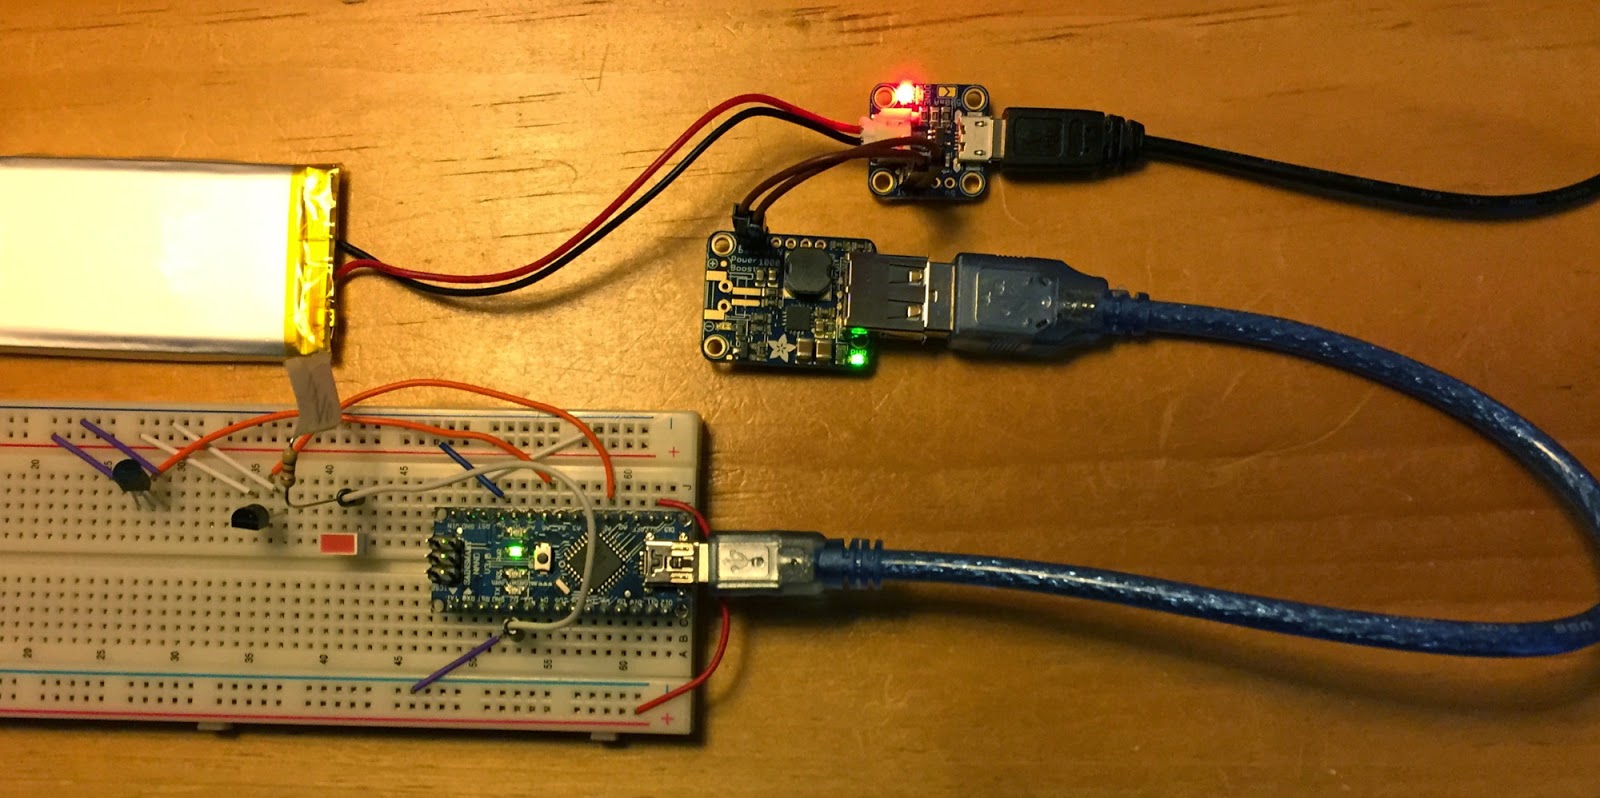
There seems to be precious little help on line for this even though it turned out to be pretty easy. I watched --

I got my parts from Adafruit (charger: $6, powerboost: $15, 1200mAh battery: $10, plus their irritating shipping charges).


I tested this with an Arduino Nano--
both external power and  battery (note red LED*)

And with my Spark Core--
just battery

You can connect/disconnect the battery any time. And this will work for Raspberry Pi just as well (REVISED: probably, if the system doesn't draw more than 1000mA -- see dicks-raspberry-pi.blogspot.com/).

Also REVISED: When I let the Spark run until the battery ran down there was a problem: The Powerboost didn't just quit cleanly. The boost/Spark stopped/restarted, stopped/restarted (voltage hiccups?). I suppose that when the boost stopped drawing current then the battery recovered a bit. Anyway: not nice. The Powerboost has an Enable pin (labeled (EN). Grounding that will stop things cold. Then how does it restart? What un-grounds the EN? See * note below. Kudos to Spark that the Core survived undamaged! Note: the Powerboost did not survive (Adafruit replaced it).

Considering the way that (non-hobby) "programable controllers" are used, I'd think that a UPS setup like this would be about Arduino Lesson 3!

___________
* If you aimed a photo resistor ($1) at the charger's red LED external power indicator then you could detect power failure and shutdown gently (but HOW and HOW-TO-RESTART?).

Tuesday, March 31, 2015

10: Spark Core Battery Drain

I don't have a meter on input but the 12,000mAh battery shown in the post 9 image is only down 25% after about 30 hours. The same battery will only run a Raspberry Pi model B (and similar devices) for about 24 hours.

Sunday, March 29, 2015

9: Spark Core/Imitation Arduino

I've managed to build a sketch for the Core that lights an LED, switches relays, reads a photo sensor and reads temperature from a TMP36. These activities are controlled from a Raspberry Pi and the results are posted on the Web. Here's a messy pic of the Spark setup powered by a battery.

(the cludged-up 9V flashlight (lower-left) is to prove the switch is working)

Here's the sketch:
int led = D0;
int relay1 = D7;
int relay2 = D6;
int photo = A0;
int tmp36 = A1;
int rval;
int r1state = 0;
int r2state = 0;

void setup()
{
    Spark.function("spark", getSpark);
    pinMode(led,OUTPUT);
    pinMode(photo, INPUT);
    pinMode(relay1, OUTPUT);
    digitalWrite(relay1, HIGH); // backwards for "normally closed" relay
    pinMode(relay2, OUTPUT);
    digitalWrite(relay2, HIGH);
    pinMode(tmp36pin, INPUT);
}

void loop() {
    // not used
}

int getSpark(String command)
{
    int raw, f;
    float v, c;
    
    int cmd = command.toInt();
   
    blink(cmd); // for my visible feedback
    switch(cmd) {
    case 1: // return photo sensor analog reading
        rval = analogRead(photo);
        return rval;
    case 2: // switch relay 1
        if(r1state == 0) {
            digitalWrite(relay1, LOW);
            r1state = 1;
        } else {
            digitalWrite(relay1, HIGH);
            r1state = 0;
        }
        return r1state;
    case 3: // switch relay 2
        if(r2state == 0) {
            digitalWrite(relay2, LOW);
            r2state = 1;
        } else {
            digitalWrite(relay2, HIGH);
            r2state = 0;
        }
        return r2state;
    case 4: // return TMP36 temperature in F
        raw = analogRead(tmp36);
        v = (raw * 3.3) / 4095;
        c = (v - 0.5) *100;
        f = (c * 9.0/5.0 + 32.0);
        return f;
    default:
        break;
    }
    return cmd;
}

void blink(int n)
{
    int i;
    
    for(i = 0; i < n; ++i) {
        digitalWrite(led, HIGH);
        delay(500);
        digitalWrite(led, LOW);
        delay(500);
    }
}

Monday, March 16, 2015

8: My Spark Core

This wasn't too painful. The $40 Core came in a cute box complete with cable and half-size breadboard (neither of which I needed).
Spark's web info is nicely finished and things work almost as smoothly. However, the idea that the Core is "Arduino compatible" is a stretch. First off, the processor is different; it's 4 times faster and has 4 times the memory, but fewer ports. The C Language programming syntax is the same but not the libraries. Also, a C "int" variable is 32 bits, not 16. Non-trivial Arduino sketches will not just plug-and-play. There's no Arduino-like app for my Mac. One programs from their www.spark.io/build web-based interface. Once you get the Core set up with your wifi & Internet (both required) the USB cable is mostly just for power. When you are ready to test a program you click the "flash" button and the source gets uploaded, compiled and downloaded. This takes longer than from the Arduino.app but for the smallish programs one usually writes for a "programmable controller" it's not a big deal.

Tuesday, March 10, 2015

7: A Compact, Secure Way to Mount a Nano
(modified 9/22/15)

I got a couple of these through Aliexpress. Without wires coming out the edges this thing is less than 1.5" wide.

Each Arduino pin is brought out to a screw-down connector. Screw the patch wires down and the whole thing is much more rugged than using a no-solder breadboard. The unit came in pieces -- 60 solder joints to complete it. Yuck. Testing them all was a trial.

Another mounting trick I'm interested in: use a 40-pin ZIF (zero insertion force) connector.

I'm not sure if this will work -- is it wide enough? But if the Nano fits with width to spare then you could put the Nano at one end and also clamp jumper wires out to sensors, etc. NOTE: Doesn't work!

Sunday, March 8, 2015

6: Question about RFID-522 Reader

I wanted to do the "unlock the door using an RFID chip" trick. So I got a device from Sainsmart.

http://www.sainsmart.com/arduino/arduino-components/sainsmart-mifare-rc522-card-read-antenna-rf-rfid-reader-ic-card-proximity-module.html

Besides the sensor the package handily included one-each RFID keyfob- and credit card-type test devices.  I downloaded a library and sample sketch from the Internet, wired up the device and -- it didn't work. I downloaded a different library and sketch -- also didn't work. I was trying to test using the keyfob. Then I accidentally tested using the card. Worked! It had always worked.

I complained to Sainsmart and they eventually sent me a whole 2nd setup (new device, new fob, new card). Both cards work, neither of the fobs are recognized.

Anyone understand this problem?

Here's my sketch:

/*  Nano pins:
  RST: Pin 9
  SS: Pin 10
  MOSI: Pin 11 
  MISO: Pin 12 
  SCK: Pin 13  
*/  
#include <SPI.h>  
#include <RFID.h>  
#define SS_PIN 10  
#define RST_PIN 9 

RFID rfid(SS_PIN,RST_PIN);  
int serNum[5];

void setup(){  
  Serial.begin(9600);  
  SPI.begin();  
  rfid.init();  
}  

void loop(){
  int i;
  
  if(rfid.isCard()) {  
    if(rfid.readCardSerial()) { 
      for(i = 0; i <= 4; ++i) {
        Serial.print(rfid.serNum[i]); Serial.print(" ");
      }
      Serial.println("");  
    } else {
      Serial.println("nr");
    }
  } else {
   Serial.println("-");
  } 
  rfid.halt();
  delay(1000);  
}